DITA-OT: Scaling Images in PDF Output
When generating PDF output via the DITA Open Toolkit, users often stumble over image scaling issues. While smaller graphics are typically rendered without problems, large images may extend beyond the page dimensions, throw errors in the log file or not appear at all. So we need a way to downscale larger images.
There are basically two options: either add image dimensions to the DITA source files, or adjust the resolution of the images themselves. The latter can be done by hand, via batch processing, or with a system-wide service.
Specifying Dimension Attributes in DITA Markup
Recent toolkit versions (as of 1.4.3) honor the dimension-related attributes in the <image> element, so specifying the height or width of the image is often enough:
<image href="../path/to/file.png" placement="break" width="15cm"/>
This first method affects both HTML and PDF output. However, if you’re using an older toolkit version, if modifying your DITA source files isn’t an option, or if you only want to change the scale in PDFs (but not in HTML), you may be better off changing the metadata of the image files instead.
Adjusting Image Resolution
If you’re using RenderX XEP to produce PDFs, setting the image resolution to 120 dpi will often do the trick. The XEP User Guide includes this useful bit of wisdom:
Bitmap graphic[s] that have no built-in resolution or dimension data, default to a resolution of 120 dpi (5 dots of a 600-dpi printer) as prescribed by the CSS2 Spec.
So that’s what we need to know: XEP assumes a resolution of 120 dpi.
As the User Guide explains:
This is always the case for GIF images, but may also occur with other image types. The XSL Recommendation suggests using 0.28 mm as a pixel size in such cases, which corresponds to 90 dpi resolution. A smaller pixel size gives better print results because the proportion between pixel size and page width is similar to that of a computer screen. With lower resolutions, often the large GIF/JPEG images fit onto a screen but not into the printable area on the page.
You can use your favorite pixel graphics program to change the image resolution to 120 dpi. You don’t want to resample the image, only change the dpi setting (or “pixel density”) in the image metadata.
This is easy to do by hand for a single image, but it quickly gets tedious for large numbers of files.
Processing with ImageMagick
As the name suggests, the ImageMagick software suite provides a powerful arsenal of tools and wizardry that can be used to perform any number of tricks on individual images, or entire directories.
If you’re running Mac OS X, you can use MacPorts to install ImageMagick:
sudo port install ImageMagick
The versatile mogrify command included with ImageMagick can be used to edit images in place, overwriting the original files. The units and density options will do just what we need:
mogrify -units PixelsPerInch -density 120 test.png
This sets the pixel density of test.png to 120 dpi. To process all PNG files in a folder, use:
mogrify -units PixelsPerInch -density 120 *.png
These commands can be adjusted to process all image types in a folder at once, or chain other effects (such as drop shadows) into a single command.
Creating a Mac OS X Service with Automator
If you’re a little leery of the command line and prefer something a bit more user-friendly, you can use Automator to create a system-wide service. Then changing the resolution for a selection of files is as easy as selecting a command from the Services menu.
To create the service with Mac OS 10.6 Snow Leopard:
- Open
/Applications/Automator.app, select the Service template and click Choose. - At the top of the workflow area on the right side of the window, change the first list option to image files.
- From the Automator library, add the Run Shell Script action. Leave the Shell set to
/bin/bash, set Pass input toas arguments, and replaceechoin the default script with/opt/local/bin/mogrify -units PixelsPerInch -density 120.
When you’re done, the Automator dialog should look like this:
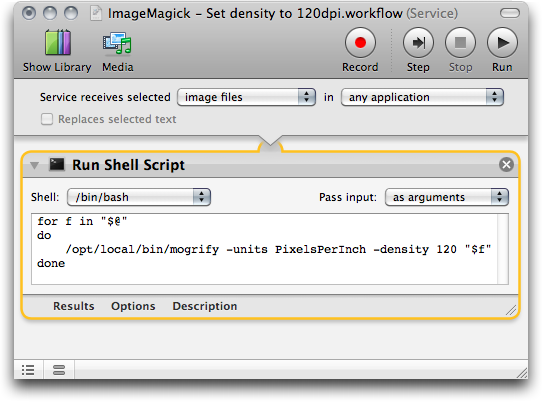
Save the workflow as a service, and you can run it on files & folders in the Finder by Control-clicking and choosing your new command from the Services submenu in the shortcut menu.
If you’d rather, you can just download a copy of my service here. Unpack the archive and copy the contents to ~/Library/Services.