
Best Practices Newsletter Article — Automating DITA Builds
After speaking at DITA Europe 2013 in Munich, I was invited to expand my presentation on “Automating DITA Builds” to an article for the Best Practices Newsletter published by the Center for Information-Development Management.
The article served as the basis for my presentation at the Content Management Strategies / DITA North America conference in Seattle.
Lightweight Continuous Integration for Documentation Projects
Expensive solutions are not necessary to automatically publish XML content. There are many ways to automate the process, and a range of open source tools and scripting solutions can be used. Using a software development technique known as “continuous integration” (CI), documentation teams can publish even minor changes regularly without manual intervention.
By building the entire publication with each revision, authors can easily verify the impact of their changes on the final document and find errors more quickly. This approach reduces the need for repetitive manual tasks, allowing authors to focus on content and improve document quality.
This article introduces several approaches to automated XML publishing and provides examples for lightweight continuous integration from scheduled builds to watched folders and commit hooks to hosted systems.
Continuous Integration
Automation is nothing new for software developers. For years, teams have used scripted solutions to produce the final build artifacts and binary executables once a product is ready for release. But for a long time, the builds were considered the last step in the process, the final plunge at the end of a roaring development “waterfall”.
As agile development methodologies have become more popular, more and more teams have come to recognize the dangers in these waters—what if you realize after the plunge that something fell out of the boat somewhere upstream?
Wouldn’t it be better to find out sooner if something’s amiss? Rather than developing modules in isolation and waiting ’till the very end to put all the pieces together, what if each change could be included (and tested) right away?
This “continuous integration” approach builds on several key principles to ensure that changes are easily incorporated into the final product:
- Everything required to produce the product is stored in a common repository so that users can check out the source files and generate the results at any time
- An automated build process produces deliverables without manual intervention
- Users contribute changes frequently, since small chunks integrate better than monolithic pieces
- Revisions contain sets of related changes that can be rolled back if necessary (unrelated changes are split into separate revisions)
- Users test before committing (to rule out unintended side effects)
Automation Approaches
The remainder of this article describes several different approaches that can be used to automate the process of generating output from XML content. The examples assume content is maintained in the Darwin Information Typing Architecture (DITA) and that output is generated in HTML and PDF formats via the DITA Open Toolkit, but similar techniques can also be applied to other XML dialects, output formats, and processing environments.
The sections below compare several approaches in order of increasing complexity:
- Scheduled builds—build at certain times
- Watched folders—build when something happens
- Version control scripts: “hooks”—build before or after checkin
- Dedicated Continuous Integration solutions—CI servers & services
Prerequisites
Each of the approaches described below requires a build file that defines the necessary parameters for the target output formats. For DITA builds, these parameters are typically defined in an Ant script. Recent versions of the DITA Open Toolkit include sample Ant build scripts in the /samples/ant_sample/ folder of the distribution packages. For step-by-step instructions on setting up Ant scripts, see Leigh W. White’s book DITA for Print – A DITA Open Toolkit Workbook.
Scheduled Builds
Scheduled builds define regular intervals at which output is automatically generated with a system service or launch dæmon. Builds may be scheduled daily, nightly, hourly, and so on, depending on the frequency of changes in the project.
Regularly scheduled builds are easy to set up using on-board utilities available with most operating systems. They provide a simple, minimal solution that serves as an introduction to automation and can act as a “gateway drug” to more powerful automation solutions in the future. Scheduled builds make sense when changes are few and infrequent, but are likely to occur in predictably recurring intervals.
The limitations of this approach become apparent when changes are sporadic, but occasionally high in volume, as the generated output may no longer reflect the actual state of source files. If any changes have been made since the last build, users need to wait for the next build to see results, which can be particularly frustrating if a large number of changes have been made in the meantime.
However, if these exceptions are rare and changes typically follow a predictable pattern, scheduling builds yields significant time savings, even if the occasional manual build is necessary to generate output for ad-hoc changes.
Scheduling Options
Builds can be scheduled using Linux cron, Mac OS X launchd, or Windows Task Scheduler.
Mac OS X Launch Dæmons
For example, on OS X, tasks can be scheduled via the system launch dæmon by placing a simple XML file in the user’s home folder under ~/Library/LaunchAgents.
To run your build every hour, adjust the path to your build script, use the StartInterval key and set the following integer value to 3600 (seconds) (see Figure 1):
<?xml version="1.0" encoding="UTF-8"?>
<!DOCTYPE plist PUBLIC "-//Apple//DTD PLIST 1.0//EN" "http://www.apple.com/DTDs/PropertyList-1.0.dtd">
<plist version="1.0">
  <dict>
    <key>Label</key>
    <string>net.infotexture.autobuild_hourly</string>
    <key>ProgramArguments</key>
    <array>
      <string>/bin/bash</string>
      <string>/Users/username/projectdir/scripts/run-dita-build.sh</string>
    </array>
    <key>RunAtLoad</key>
    <true/>
    <key>StartInterval</key>     <!-- ← Start job in regular intervals -->
    <integer>3600</integer>     <!-- ← Start every 3600 seconds (1 h) -->
  </dict>
</plist>
(This file is available online at https://gist.github.com/infotexture/8506117.)
See the launchd man page or the tutorial at launchd.info for an explanation of the available options. If you prefer a more guided approach, utilities like Lingon or LaunchControl provide a user interface and debugging tools for launch scripts.
For a daily build that runs at midnight, replace the StartInterval key and following integer in the previous example with a StartCalendarInterval and a dictionary of integers that starts the job at 00:00 (12:00 AM).
(See https://gist.github.com/infotexture/8506547 for an example.)
Or combine these approaches to run your build once at a certain time (such as 9 AM) and in regular (hourly) intervals thereafter.
(See https://gist.github.com/infotexture/8506763 for an example.)
Windows Task Scheduler
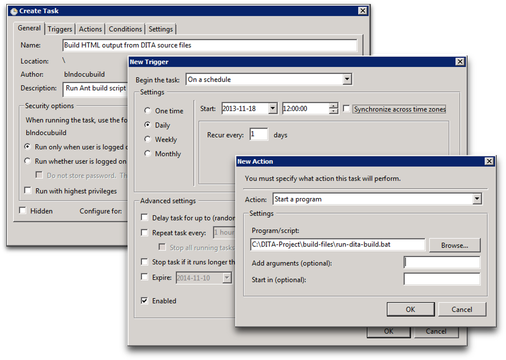
On Windows, use Accessories > System Tools > Task Scheduler to create a new scheduled task with a trigger that begins the task on a schedule and an action that starts a program (your build script); see Figure 2.
Watched Folders
When the changes in your project are too irregular or unpredictable for scheduled builds, it may be better to use a “sentinel” to monitor your source files and generate output whenever something changes—but only then.
This approach is more flexible than scheduled builds and often proves useful when little things change frequently, but at odd intervals. Since output is built for every change, you can rest assured that the generated deliverables will reflect the current state of the source files.
In contrast to scheduled builds, watched folders may require third-party tools if your operating system does not include suitable services.
Folder Watchers
On Linux, folders can be watched for changes using the incrond—inotify cron (incron) dæmon. On a Mac, OS X Folder Actions appear suitable at first glance, but this approach is quite limited, since the actions only run when files are added/removed, not if existing files in the folder are modified. Fortunately, system launch dæmons can also be used to watch folders for changes, and versatile third-party utilities such as Hazel make it easy to run scripts based on file system events.
Windows does not include suitable built-in accessories, but various shareware options are available, and Ruby-based folder watchers such as Guard or Watchr can be used on Windows as well as on Linux or OS X.
Hazel Example
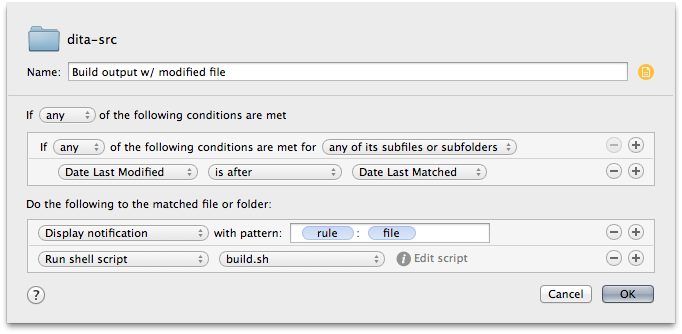
Folder watching utilities typically follow a common pattern. In Figure 3, we use Hazel to illustrate the process, but the steps are similar in most other tools.
-
Define the files or folders to watch.
In this case,
dita-src, the project directory that contains the root .ditamap file, referenced topics, images, and other assets. -
Set the conditions or events that trigger an action.
In Hazel, we create a named rule and define the conditions that must be met for the rule to match. In our case, the named rule matches if any of the files or subfolders have been modified since the last time the rule matched.
-
Specify the action to be performed when the conditions are fulfilled.
When the rule matches, Hazel tells the operating system to display a notification and runs our build script.
Tools like this make it easy to set up basic rules, but are often limited by their own simplicity. For example, what if many files are changed at once? Should the action be repeated for every change? Operations that touch multiple files (such as Git branch switching) may trigger multiple builds unnecessarily, which can cause performance problems.
Advanced utilities provide sophisticated throttling options to limit the number of concurrent processes and support the notion of “quiet periods” to prevent actions from running more often than necessary.
Launch Dæmon Example
A launch dæmon can also be used to watch folders for changes and build output. The syntax is similar to the examples shown for scheduled builds. To watch a folder for changes, specify the path to a location in the file system in the array under WatchPaths and set a ThrottleInterval to limit build frequency if necessary (see Figure 5).
<key>ThrottleInterval</key>
<integer>300</integer><!-- ← if at least 300 seconds (5m) have passed since last build, AND… -->
<key>WatchPaths</key>
<array>
  <string>/Users/username/projectdir/dita-src</string><!-- ← …if any files here have changed -->
</array>
(For the complete file, see https://gist.github.com/infotexture/8635029.)
Version Control Hooks
In contrast to scheduled builds, which automatically generate output in arbitrary intervals, or watched folders that run builds whenever files change on disk, version control hooks provide a more deliberate approach to automation.
Using this method, output is only generated when users interact with the version control system, typically before committing or after each checkin. Whereas files may often be saved to disk in incomplete or invalid states that don’t justify a build, committing changes to a version control system is a conscious and intentional action that implies the user has completed a revision worthy of retaining.
At this point in the process, it makes sense to verify whether the changes produce valid results. Modern version control systems offer mechanisms to “hook” into various stages of the workflow and perform a pre-defined action like running a build script.
- Pre-commit hooks serve to verify the input and reject changes if the build fails.
- Post-commit actions can be used to generate output for every valid change and typically do not modify the contents of the repository.
Hooks are typically enabled by modifying sample templates provided with the system. For our purposes, this means replacing the template content with the sequence of commands necessary to run a DITA build.
Options
- Subversion
- The
hookssubdirectory of a Subversion repository contains templates such aspre-commit.tmplandpost-commit.tmpl. (Remove.tmplto enable.). - Some clients provide a user interface for client-side commit actions.
- The
- Git
- On UNIX-based systems, sample Git hooks are typically found in
/usr/share/git-core/templates/hooks. - Modify a copy of
pre-commit.sampleand save the result to your local repository as.git/hooks/pre-commit.
- On UNIX-based systems, sample Git hooks are typically found in
Git “pre-commit” Hook Example
In distributed version control systems such as Git, each repository is fully autonomous. Hooks are defined and run on the local clone, so users may set up their own hooks independently of those defined on a server or in other clones of the same repository.
The hook in Figure 6 runs a build script before each commit.
#!/bin/sh
#
# Get the absolute path of the `.git/hooks` directory
export GIT_HOOKS=`cd "\`dirname "\\\`readlink "$0" || echo $0\\\`"\`" && pwd`
# Set the absolute path of the build directory
export BUILD_FILES="$GIT_HOOKS/../../build-files/"
# Set the absolute path of the DITA home directory
export DITA_HOME="$BUILD_FILES/../bin/dita-ot/"
# Set the absolute path of the DITA home directory again
export DITA_DIR="$BUILD_FILES/../bin/dita-ot/"

# Execute the build script in the shell that is provided by the DITA start script
echo "$BUILD_FILES/build_html.sh" | "$DITA_HOME/startcmd.sh"

# Display OS X system notification via <https://github.com/alloy/terminal-notifier>
echo 'HTML build succeeded. Committing…' | /usr/local/bin/terminal-notifier -sound default

# Exit with status of last command
exit $?
(This file is available online at https://gist.github.com/infotexture/8635931.)
Client-Side Commit Actions
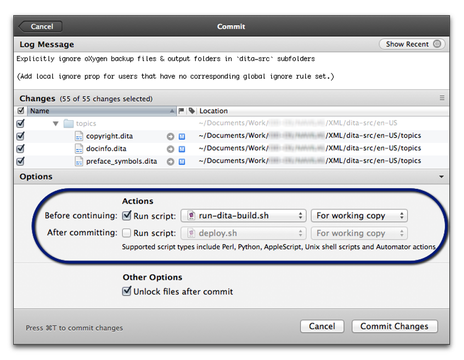
In comparison with scheduled builds and watched folders, commit hooks can be more complicated to set up—especially with centralized version control systems such as Subversion, where hooks are run on the server and may thus require system administrator assistance.
Fortunately, Subversion clients such as Cornerstone, shown in Figure 7, include user interface options that allow users to associate their own scripts with commit actions, independent of the repository configuration (and without the assistance of a system administrator).
Bypassing Commit Hooks
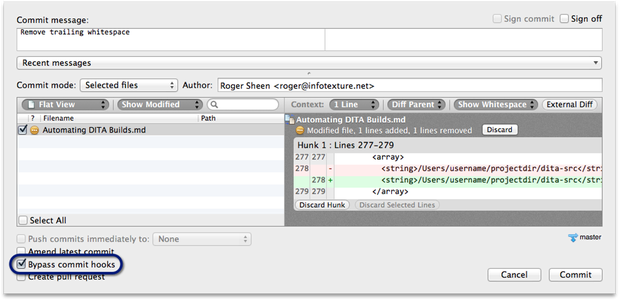
Another potential issue with this approach is that commit hooks slow down the checkin process, since the version control system waits for a build to finish before checking in the changes. Moreover, the strict regime imposed by pre-commit hooks can prevent checkins if something goes wrong.
Fortunately, many clients and systems allow you to circumvent commit hooks if necessary (such as the --no-verify option for the git commit command.) Atlassian’s free SourceTree client for Git & Mercurial provides an option to bypass hooks on the commit sheet (see Figure 8).
Dedicated CI Solutions
True continuous integration solutions combine the strengths of each of the options outlined above and are intended for use in team environments. They communicate with a version control system, using commit hooks as a foundation for additional process automation mechanisms. Since most CI solutions are designed to run on a dedicated server or cloud service, the additional benefits come at no performance expense to the user’s local machine.
If your developers use continuous integration tools to run automated tests and build software binaries whenever they update their code, you may be able to use the same solution to build your DITA deliverables. Doing so allows you to leverage existing corporate infrastructure and developer expertise and automate other aspects of the publishing process, such as
- providing access to drafts on an intranet for internal review and signoff
- integrating documentation into the final software installers
- publishing to the company web site for immediate public access
CI servers typically run pre-defined actions whenever code changes are pushed to the version control system. In contrast to the local options outlined earlier, CI systems run actions after revisions are shared, which means that the results of any bad commits (such as unstable builds or failed tests) are public. This provides an additional layer of accountability and can improve quality as developers have a strong incentive to ensure that any revisions they commit are valid and functional before they share them.
Options
While a broad range of commercial CI solutions are available, the open-source offerings in this arena are among the most mature, actively maintained, and widely adopted:
- CruiseControl—the original solution from ThoughtWorks (now open source)
- Jenkins (formerly known as Hudson)—cross-platform open source CI server
- Travis—hosted CI service used to build and test projects hosted on GitHub (including the DITA Open Toolkit)
The examples below are based on Jenkins, one of the most popular CI solutions. Jenkins provides installers for a variety of operating systems, so you can run it on your own computer, a company server, or cloud hosting platforms such as Amazon Web Services or CloudBees.
Like the watched-folder approach outlined above, a Jenkins job combines a series of settings that define the access credentials and branches of the source code repository, the conditions or events that trigger a build, and the action to be performed when the conditions are fulfilled (typically a build script and a series of post-build actions, such as e-mail notifications or file transfers).
Sample Jenkins Job View
Jenkins provides a web interface with a dashboard that includes an overview of jobs. For each job, the dashboard shows the status of the last build, and a “weather report” icon that represents the aggregated status (stability) of recent builds (see Figure 9).
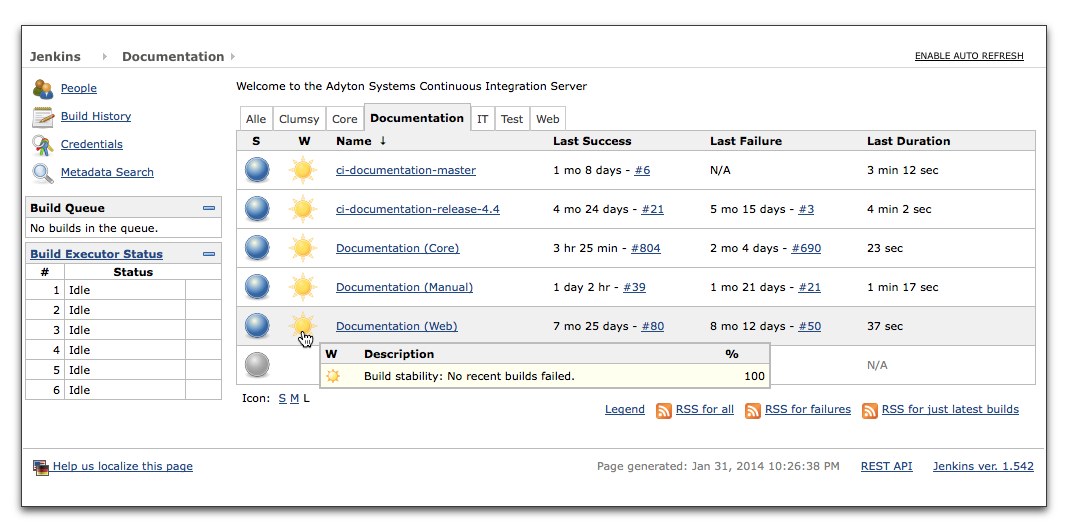
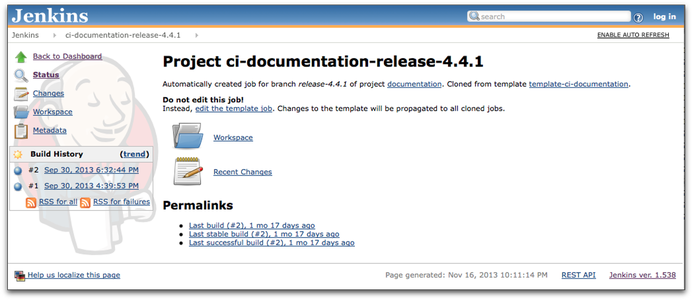
The dashboard links to dedicated pages for each job (see Figure 10), with additional information on the build history, links to the workspace with the job output (build results), and recent changes (the commit log from the version control system).
Sample Jenkins Script
For a sample Jenkins build script to generate output and copy the results to a web server, see https://gist.github.com/infotexture/8742667.
Summary
Your operating system may already provide the tools you need for lightweight local automation options such as daily builds or watched folders. If you’re just getting started with process automation, these methods are usually a good way to begin.
If you need a way to verify your changes before committing revisions to a version control system (or test the results afterward), commit hooks provide a smarter alternative that augments the advantages of intentional user action with the amenities of process automation.
As your appetite for automation increases and your team grows, you’ll soon be ready to graduate to true continuous integration, allowing you to do more than just build output—or perhaps even to continuous deployment solutions that provide instant access to your latest documents for all your customers.
However you begin, and whatever process you may choose, I encourage you to explore the possibilities for automation in your own publishing workflows.
References & Resources
Further Reading
- Martin Fowler’s article on Continuous Integration
- Eliot Kimber’s article DITA without a CMS: Tools for Small Teams
- Leigh W. White
DITA for Print—A DITA Open Toolkit Workbook
2013, Laguna Hills, CA
XML Press
ISBN: 978-1-937434-05-2
Selected Tools
launchd- Lingon (launchd GUI)
- LaunchControl (debugger)
- Ruby-based folder watchers
- Hazel (folder watcher for Mac)
- CruiseControl (original CI server)
- Jenkins (popular open-source CI server)
- Travis (hosted CI for GitHub projects)
- CloudBees (Jenkins in the cloud)